How To Achieve Dynamic Redirect URIs [OAuth2]
Table of Contents
As defined in the OAuth2 specification, a client should register its redirect URI before using it at the authorisation endpoint. The protocol defines that a redirect URI is static and absolute - no wildcards are permitted. It should be noted that some OAuth2 implementations remove this restriction; please check if the service that you are using supports wildcards in the redirect URI before you continue reading.
In this article, I will showcase a work-around that I recently implemented when running into this problem myself. This solution is suitable for both native apps and web apps.
An Appropriate Use Case
Firstly, if absolutely required, this work-around could be implemented in order to overcome a limit on the number of allowed redirect URIs. However, the typical use case for this strategy is when you have a dynamic subdomain which is required to be part of the redirect URI.
The situation that I encountered which required me to use this method was as follows:
- there was an application which was linked to an OAuth2 client
- the application was entirely self-contained and hosted its own callback/redirect URI
- the application was being sold to businesses and hosted on the Salesforce platform
- this meant that one business could have the redirect URI
https://org-alpha.my.salesforce.com/callbackand another business could have the redirect URIhttps://org-beta.my.salesforce.com/callback - the first element of the subdomain was completely dependent on the name of the business that the tool was sold to.
- this meant that one business could have the redirect URI
The only other way of solving this problem would be to add the business’s self-hosted redirect URI to our OAuth2 client after we had sold them the product. However, not only would this be the opposite of elegant, the OAuth2 client only supported a maximum of 25 redirect URIs - so we would only be able to sell the product to 25 businesses.
The Solution
My solution to the problem is to repurpose the OAuth2 state parameter and to use what I call a ‘URL propagator’. From an abstract perspective, it is just a service which is hosted at a static URL and redirects the user to whichever dynamic URI they require. The static URL of the URL propagator would then be added as the sole redirect URI for the OAuth2 client.
But then we must ask the question, how does the URL propagator know which dynamic redirect URI to redirect incoming users to? The solution is seamless: the client will include the dynamic redirect URI in the state parameter as it is maintained throughout the entire authorisation flow. This usage of the state parameter does not nullify its previous purpose, you can still very easily include unique information in this parameter in addition to the redirect URI.
So before using this work-around, the state parameter in your OAuth2 flow may have looked something like:
state=a527b3d4fcf0c9a7
however I am proposing that you change it to be:
state=https%3A%2F%2Fexample.com%2Fcallback
# Decoded Value: https://example.com/callback
This is under the assumption that the dynamic redirect URI for this request is https://example.com/callback. It is important to note that the state parameter is URL encoded, this maintains the integrity of the dynamic redirect URI and any additional parameters.
In order to maintain the original purpose of the state parameter, you can concatenate it with the redirect URI as a request argument (still URL encoded):
state=https%3A%2F%2Fexample.com%2Fcallback%3Fstate%3Da527b3d4fcf0c9a7
# Decoded Value: https://example.com/callback?state=a527b3d4fcf0c9a7
This means that integrity checks can still occur at each end of the authorisation flow.
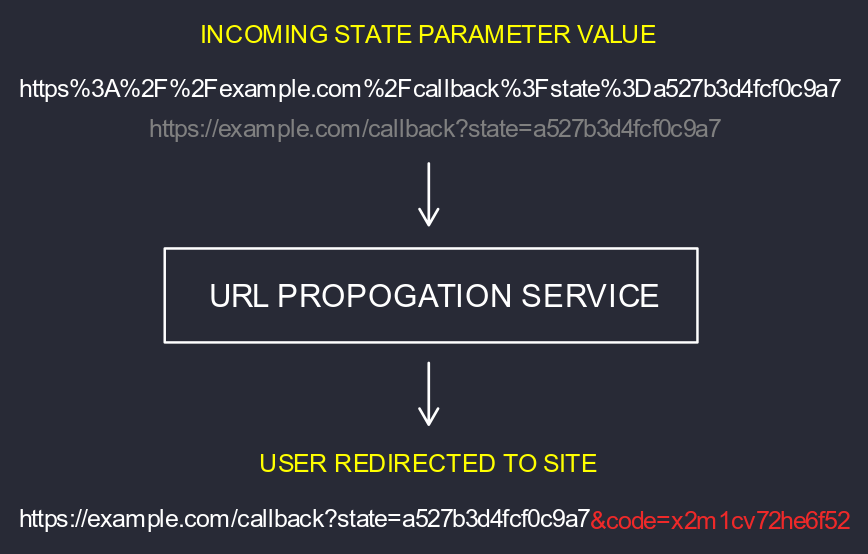
However, simply redirecting the user to the dynamic redirect URI won’t achieve a complete authorisation flow. The callback at the redirect URI requires the code parameter returned from the OAuth2 authorisation process, so this should also be appended to the state parameter as a request argument by the URL propagator.
Here is a diagram demonstrating what the URL propagator does:

Creating A Free URL Propagator
It is incredibly simple to program and host a URL propagator. For the sake of this article I will use a free, hosted platform to create a proof of concept with minimal code. If you are building a URL propagator for your business, I would recommend including extra logic to ensure that it isn’t being misused (i.e. check the request referrer).
Pipedream is a free (assuming under a certain usage volume) workflow platform that allows developers to capture HTTP requests, manipulate them, and return HTTP responses. It can do more than that but that’s all we need. Create a workflow that captures a HTTP response and add a step to run JavaScript code. The code should be as follows:
export default defineComponent({
  async run({ steps, $ }) {
    await $.respond({
      status: 302,
      headers: {'Location':
        decodeURIComponent(steps.trigger.event.query.state)
        + '&code=' + steps.trigger.event.query.code
      },
      body: steps.trigger.event.query,
    })
  },
})
That is the URL propagator completed. You can deploy it and use the provided static Pipedream URL as your new redirect OAuth2 URI. The JavaScript above is very simple, when a request is received it simply responds as follows:
- status code 302 (redirect)
Locationheader equals the URL decodedstateparameter concatenated with thecodeparameter (so that the dynamic redirect callback receives the authorisation code)- the response body is not necessary but can be useful for debugging
By utilising the above setup, you can now work around static redirect URI restrictions for OAuth2 clients when necessary.